Adapting Chevrolet V8 Engines to the Kaiser Jeep M7xx Trucks
The Kaiser Jeep M715 and its M7xx military truck family are extremely capable and rugged platforms — and with a Chevrolet Small or Big Block V8 under the hood, they become unstoppable.

The Novak M715 Military Truck
The M715 makes an excellent, reliable truck when repowered with a Chevrolet Small Block and Big Block V8 engine. The conversion is straightforward thanks to the ample space in the engine compartment.
We recommend the following engines as top choices:
The Novak #C715 Conversion Kit works with all Chevy and GM V8’s. Because the truck weighs nearly 6,000 lbs empty, a 300+ cubic inch engine is recommended.
---
Transmission
The M715 uses a Borg-Warner T98 four-speed transmission, different from the civilian version. It mounts separately from the transfer case, has a shorter input gear, and omits the adapter plate found on civilian models. This requires a unique #C715 adapter kit.
Shorten the factory T98 retainer by 1” (not more than 1¼”) to clear the GM retainer. Be careful to preserve the oil control grooves. Wrap masking tape as a guide for cutting.
---
Clutch Setup
Use an 11” diaphragm clutch for smooth engagement, or a 10½” Borg & Beck if preferred. A Chevy #RAGM release arm is required. The T98’s 1-1/8”–10 spline fits a standard Chevy clutch hub.
Install the provided pilot bushing in the crankshaft (chill it if tight). Align the clutch disc using an alignment tool or transmission input shaft before final assembly. Reference the Clutch & Bellhousing Guide for setup and bearing selection.
---
Clutch Linkage
A small fabrication project is needed to adapt the factory clutch linkage:
- Cut a ¼” × 2” × 6” steel plate for the new support bracket.
- Drill two 15/32” holes on 5⅛” centers.
- Weld and reposition the original bracket arm 90° as shown in the factory sketch.
- Shorten the clutch cross shaft by 1½” and realign the arms before welding.
- Use self-aligning rod ends for better operation.
- Make a new 7¼” lower pushrod from ¼” pipe with a ½” ball welded on one end and a 3/8–24 bolt on the other.
Attach a light return spring from the release fork to the cross shaft to retain the pushrod.

If properly installed, you’ll have a small air gap (~.030–.040") between disc and flywheel when the clutch is released. Adjust for air gap, not free play.
---
Electrical
You can either retain 24 volts or convert to 12 volts:
Keeping 24V:
- Fabricate a bracket to mount the military generator.
- The Chevy starter will run on 24V, though harshly.
- Use a separate 12V solenoid for activation.
- Use ballast resistors for 12V coils.
Converting to 12V:
- Allows use of modern, affordable parts.
- Easiest approach is to rewire from scratch using our 12V Conversion Guide.
---
Gearing
The M715 uses a Dana 60 front and Dana 70 rear axle. Ratios include 5.89 (stock), 4.88, 4.56, 4.10, and 3.73.
With stock 36” tires and 5.89 gears, RPM is about 3,000 @ 55 mph — excessive. Use 4.88 or 4.56 for better drivability.
Calculate your ideal ratio with our Gearing Calculator.
---
Transfer Case

The New Process 200 is a gear-driven, dual-range case (1.96:1 low) and is plenty strong for V8 power. Comparable to the NP205, it’s all gears and no chains — very durable.
---
Engine Mounts

The Novak MMX Mounts for M715
Our #MMX mounts weld to the existing frame brackets. They are adjustable, rugged, and allow for a non-invasive installation.
If using an HEI distributor, you may need minor firewall clearance.
Tips:
- Test-fit before final welding.
- Small firewall clearance dents may be required for heads/manifolds.
- After fitment, final-weld and paint for durability.
---
Adapter & Installation
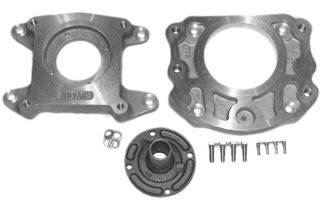
Use Novak Kit #C715
Install with transmission and adapter pre-assembled. Do not pull together with bolts if alignment is off — recheck clutch centering instead. Center the engine (15” crank-to-frame both sides) and tighten frame bracket bolts.
---
Final Assembly
Do not over-tighten mount bolts. Snug them enough to prevent movement without crushing the urethane isolators. Use jam nuts to lock in place.
After painting, reinstall for a clean, factory-style appearance.
---
Exhaust

Use tight-fitting block hugger headers or shorty manifolds for clearance.
Route a Y-pipe down the passenger side of the frame, leaving space for brake and wiring.
Novak Gen I–III+ headers are ideal for flow and fitment.
---
Cooling
V8 swaps often need improved cooling. See our Cooling Guide.
Some users retain the stock radiator with modified outlets; others add rows or use an upgraded core.
---
Throttle & Steering
Throttle control is best via a GM cable and pedal (1970+).
Steering can remain stock, though Saginaw power steering is a great upgrade. Use a longer pitman arm—available from Boyce Equipment.
---
Conclusion
While performing this conversion, remember: it’s the details that make or break a clean, reliable swap — linkages, clearances, brackets, and patience. With the right Novak kit and planning, this becomes a straightforward, rewarding upgrade.
Keep these instructions and part references handy for future maintenance. If you purchased your kit directly from Novak, our tech team can help with any questions.
